I’ve been working from home exclusively for the last nine years, but it was only last year that I started to look into ways for expanding my computer set-up and go beyond the usual combination of having a laptop with your regular external screen. The global COVID-19 pandemic, the prospect of having more calls with colleagues than ever (no physical meetings), and the constantly increasing need for recording talks for online conferences and meet-ups made me reevaluate things and steadily improve and fine tune my set-up, in particular in regards to better video and audio quality.
When I shared a picture of my desk on Twitter recently, a few folks asked for more details on specific parts like the screen, microphone etc, so I thought I’d provide some insights in this post. Don’t expect any sophisticated test or evaluation of sorts, I’m just going to briefly describe the different components, how I use them, things I like about them, and other aspects which still could be improved. Note that I’m not affiliated in any way with any of the vendors mentioned in this post, so anything positive or negative I’m going to mention, is solely based on my personal experience from using the discussed items, without any financial incentive to do so. There are also no affiliate links.
The Screen
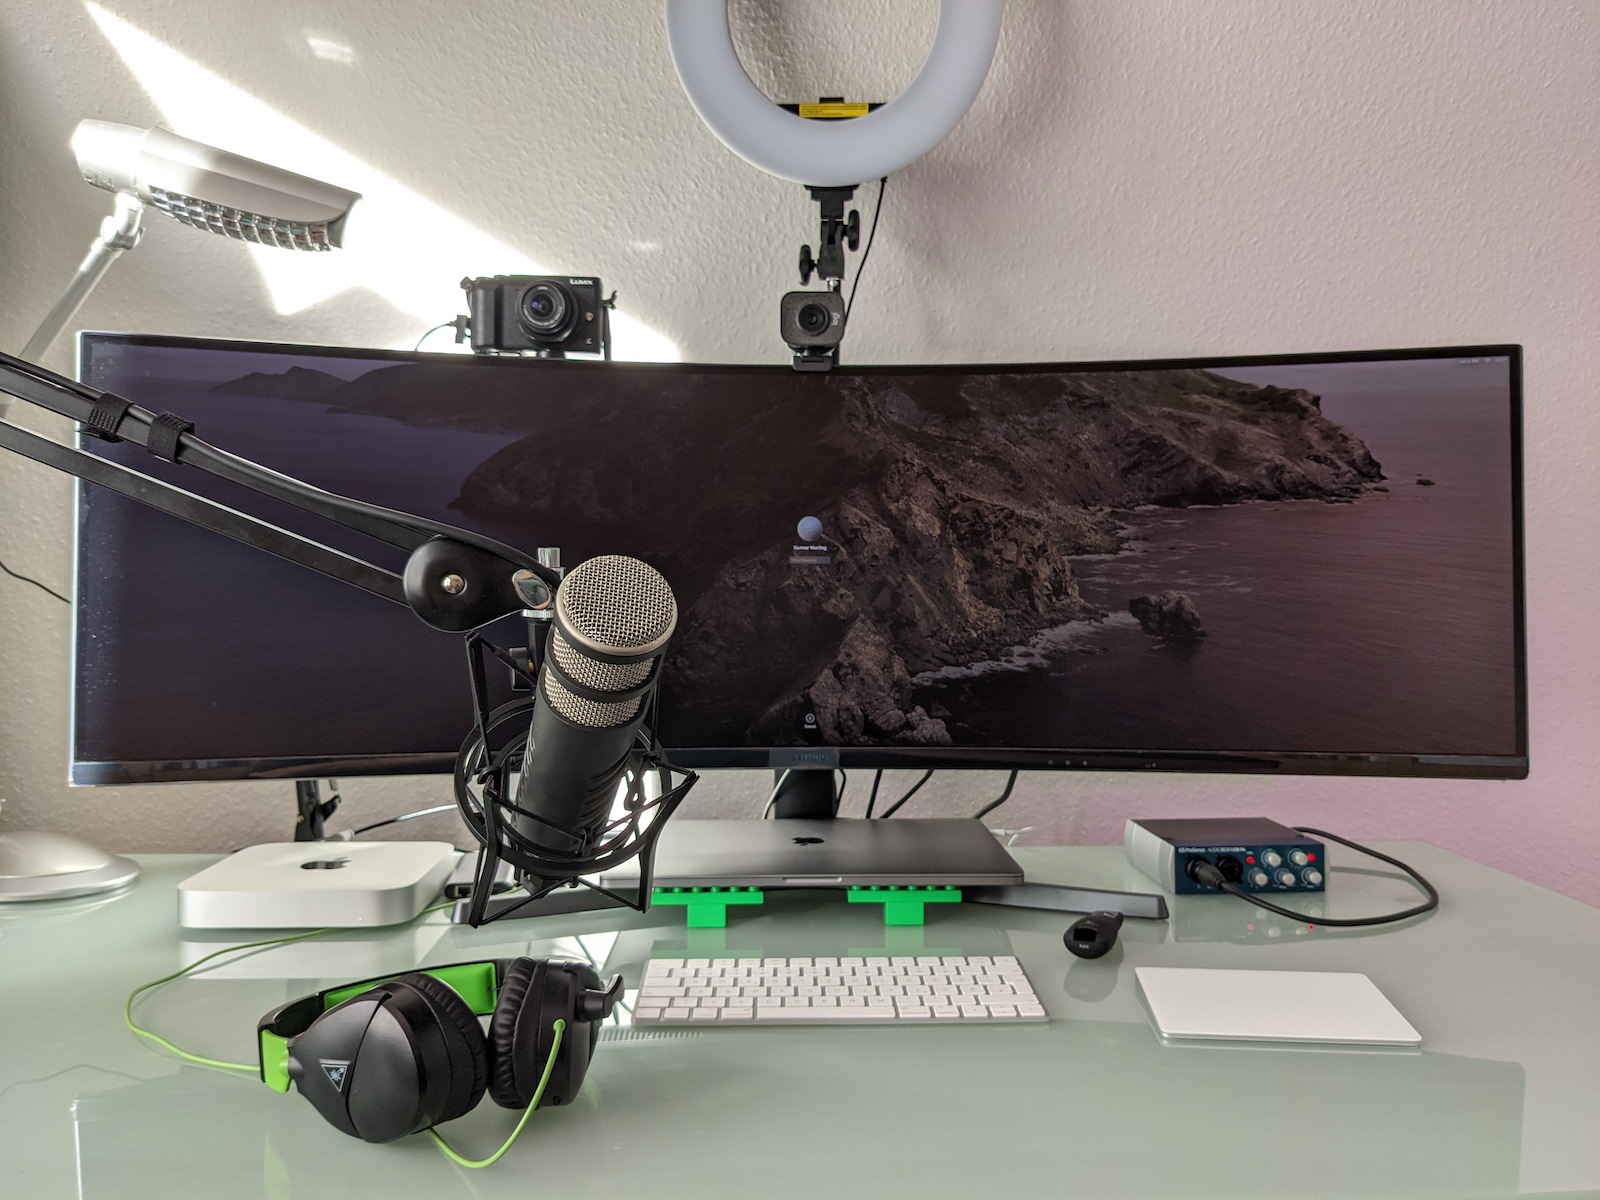
Let’s start with the most apparent part of the set-up, the screen. It’s a curved 49" 32:9 ultra-widescreen display (Samsung C49RG94SSR, 5120 x 1440 pixels), i.e. it offers the same screen real estate like two 16:9 screens next to each other.
Whether such a large screen suits your personal preferences is something which you only really can find out by yourself. Curvature of the screen is something you may have to get used to, initially I was slightly put off by (wide) windows not appearing 100% straight, but by now I don’t even notice this any more. I suggest you have a look at this article by my colleague Emmanuel Bernard, where he compares ultra-wide monitors to the alternatives and discusses the pros and cons of each. Personally, I’m very happy with this screen and really wouldn’t want to miss it. I never was a fan of multi-screen set-ups due to the inevitable frames between screens, and in fact, my only regret is that I didn’t buy it earlier. So thanks a lot for the recommendation, Emmanuel!
Some folks use window managers to arrange their application windows on large screens (e.g. Rectangle on macOS, a few more alternatives are discussed in this thread by Guillaume Laforge), but I find myself just manually organizing things in roughly three columns: communications (email, chat), editing (documents, shell, IDE, etc.), and preview (e.g. rendered AsciiDoc documents).
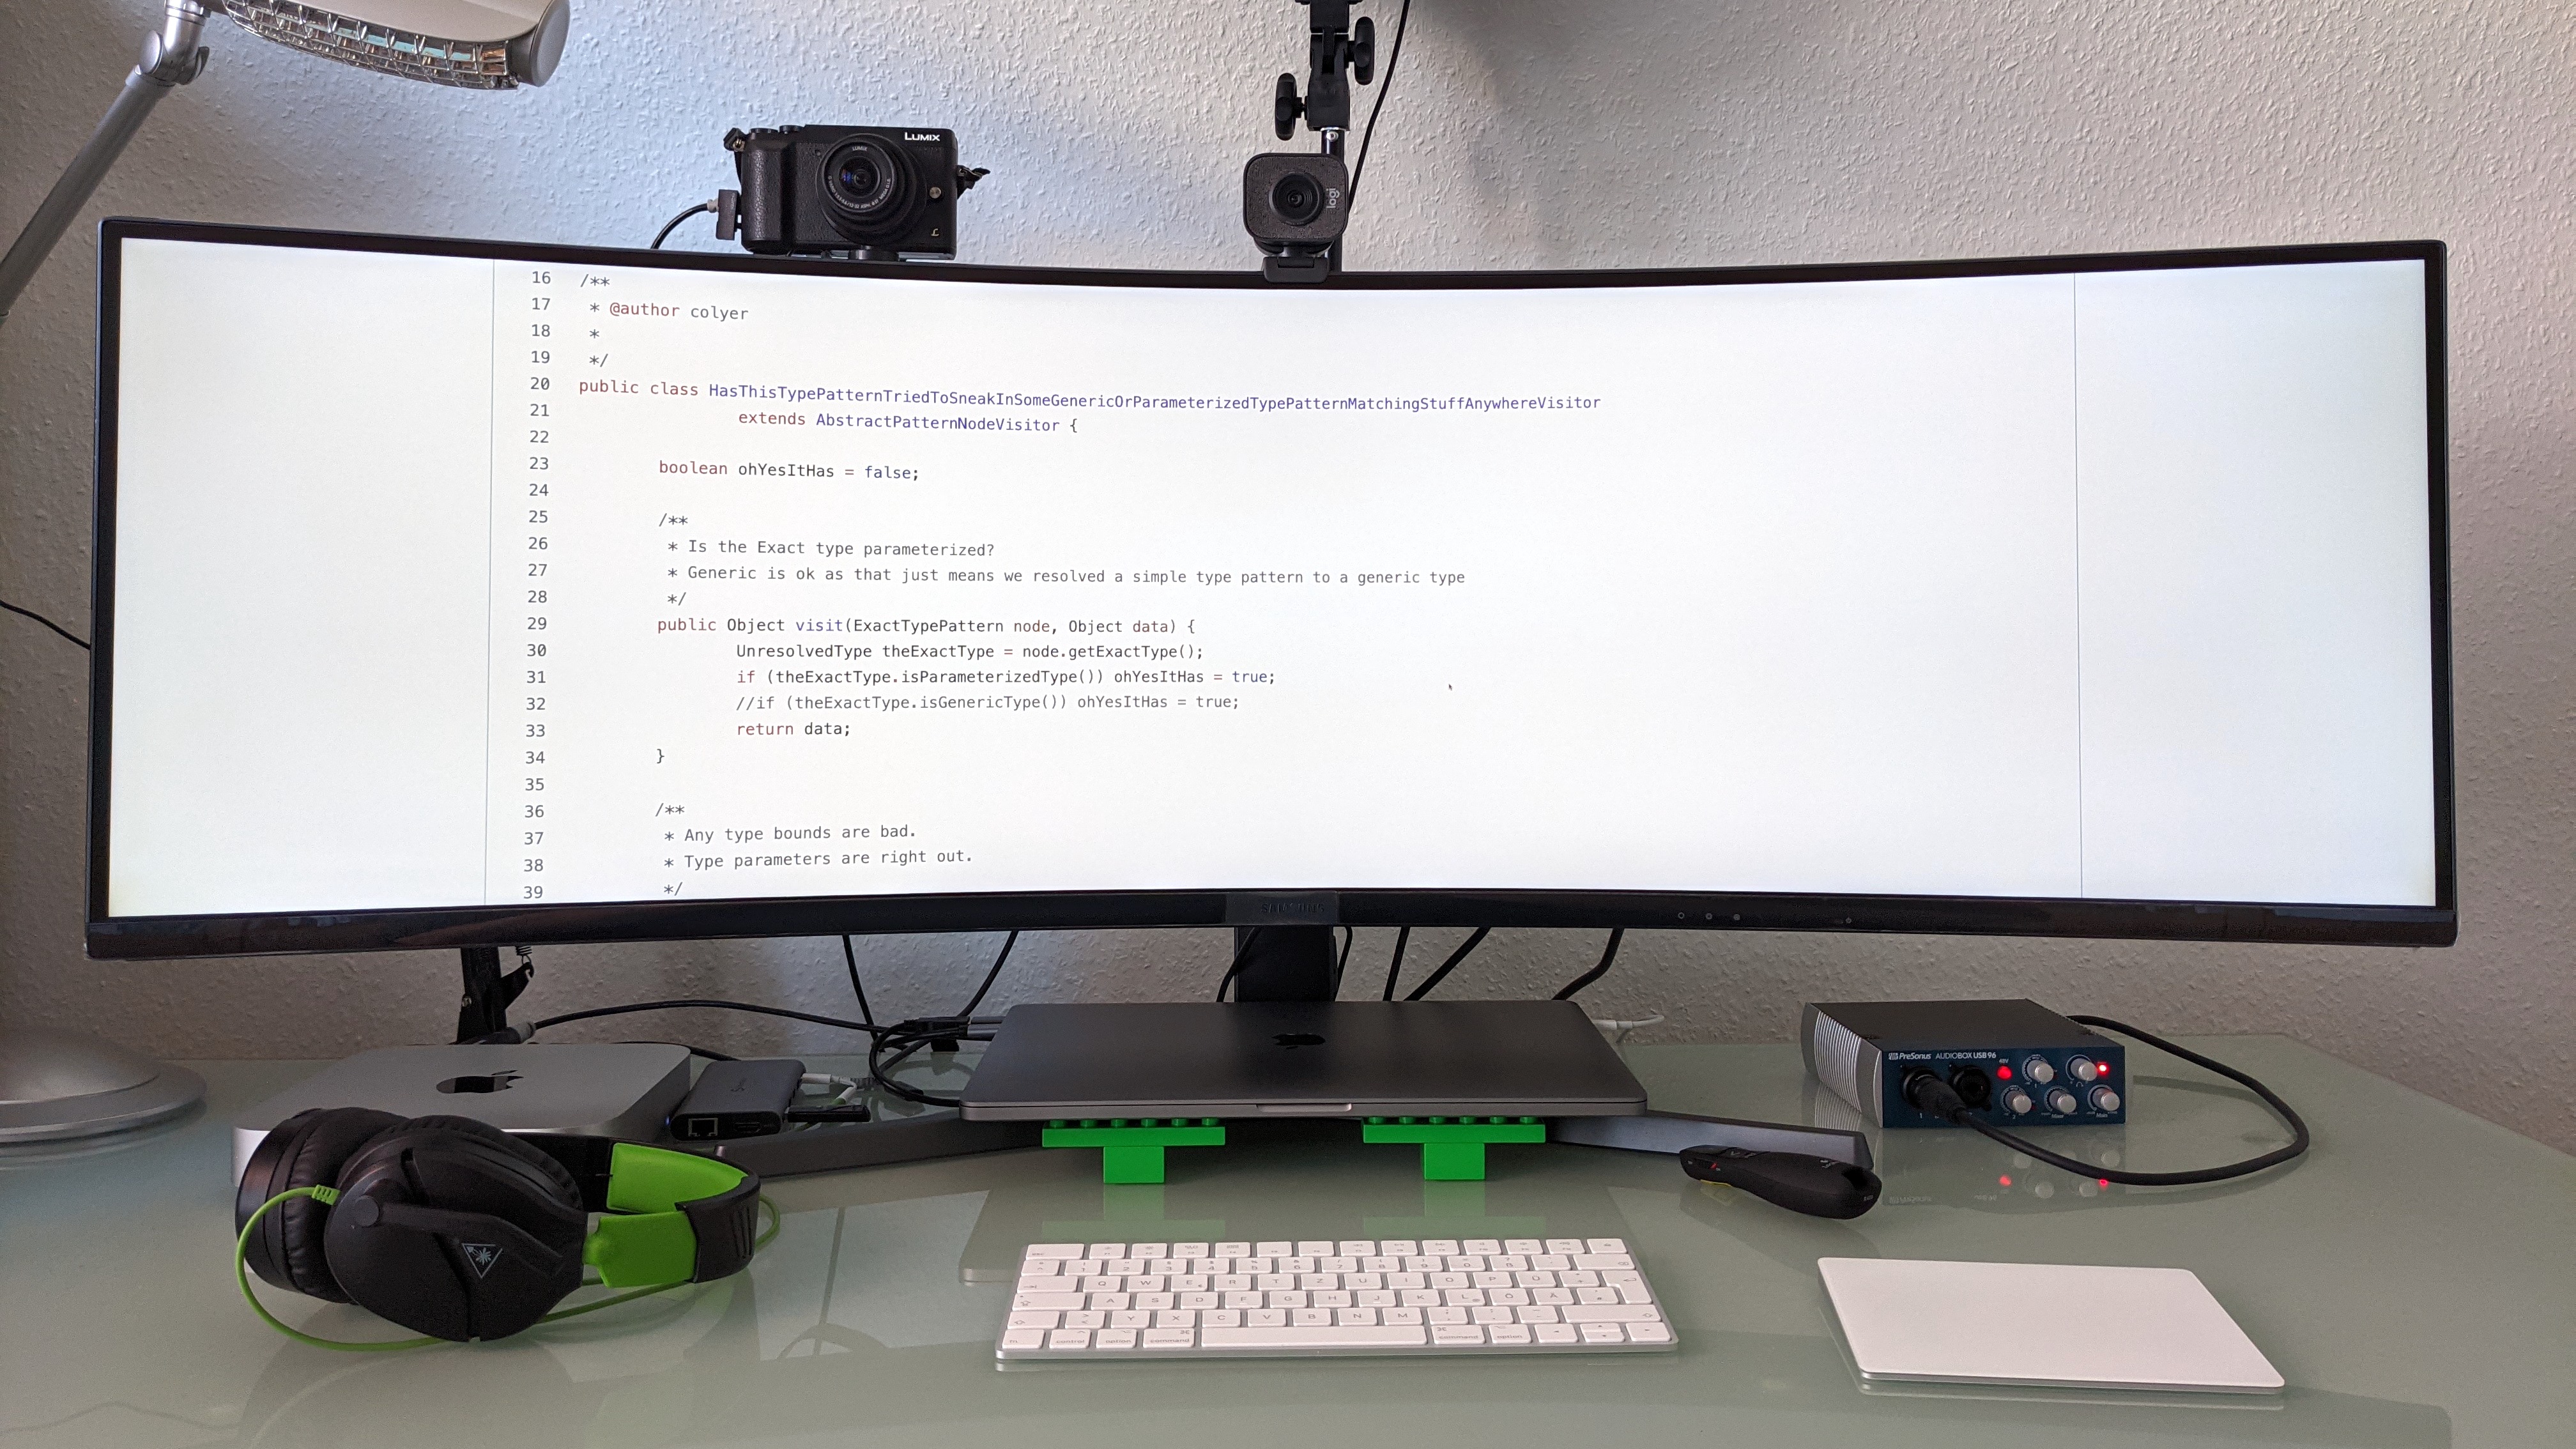
HasThisTypePatternTried…Visitor at 300%? No problem!One very useful feature of this monitor is its picture-by-picture mode (PBP): it lets you connect two sources at once, which then will show up next to each other on the screen. Now I’m typically not working with two computers simultaneously (although this can be useful when for instance editing a benchmark on one machine and running it on another), but I use PBP when doing presentations, or when recording conference talks; in that case, I’ll connect the same machine twice, i.e. as primary and secondary screen. This allows me to share one of the screens entirely for the presentation/recording (thus having the commonly expected 16:9 aspect ratio), with other applications being located on the second screen, and without having to manually adjust the size of individually shared windows or tabs. Needless to say that sharing the full screen isn’t very practical, as viewers with a regular screen would just see a small wide ribbon.
Are there downsides to this screen? So far, I’ve found two. One is its energy consumption; with 55 kWh/1,000h, it’s definitely on the high end of the spectrum. I suppose in parts that’s just due to its sheer size, but I’m sure things could be improved here. The other thing to mention is that when using it with a MacBook Pro, you should make sure to have the lid of the laptop closed (implying that you’ll need an external keyboard and mouse/touchpad), as the fan will be audible substantially more when driving both internal and external screens.
One last minor annoyance is that the screen’s software forgets the settings when enabling and disabling the picture-by-picture mode. When switching from single input to PBP, I always need to configure the input sources again. Here I’d really wish the screen would memorize the settings from the last time I was using PBP.
Compute
I am using two Apple computers to get things done: a 2019 16" MacBook Pro (2,6 GHz 6-Core Intel Core i7, 32 GB of RAM) provided by my employer, and a Mac Mini M1 2020 with 16 GB of RAM. Most work stuff is happening on the MackBook Pro, and really there’s nothing too exciting to share here; it tends to do its job just as it should. There’s two things I don’t like about it though:
-
the touch bar; it’s virtually useless to me, and I wished for physical function keys instead, making it much more reliable to hit the right key combinations, e.g. in the IDE. Granted, I work with an external keyboard most of the time, so it’s not impacting me that much
-
the only connectivity option being USB-C; while surely elegant, the required zoo of connectors and adapters to actually plug in external hardware, renders that point more than moot
Thankfully, Apple finally got that memo too and addressed both things in their latest MacBook Pro edition.
The Mac Mini is awesome for any kind of video recording and streaming. Recently, I was asked to record two Full HD streams for a talk at AccentoDev: one with my slides, and one with my camera feed, allowing the video editor to freely switch between the two when creating the final recording for publication. The M1 wouldn’t break a sweat when recording this video with a resolution of 3,840 x 1,080 pixels via OBS, with the fan barely being audible. Whereas when trying to do the same on the MBP, the fan would spin up heavily, and you’d have a hard time to not capture the fan noise with the microphone.

Originally, I bought the Mac Mini M1 to experiment a bit with running Java applications on the AArch64 architecture. Unfortunately, I didn’t really find much time yet to do so. One interesting thing I noticed though from running some quick JMH benchmarks against the new Java Vector API is that results tended to be super-stable, with a much smaller standard deviation than running the same benchmark on the x86-based laptop. I hope to find some time to dive a bit more into that area at some point in the future.
|
Cloud Compute
Every now and then, I do have the need for running something on Linux rather than macOS, or for spinning up multiple boxes, executing a benchmark for instance. Ok, ok, they are not actually running on my desk, but I thought it still might be interesting to share a few words on that. My preferred go-to platform for these scenarios is Hetzner Cloud, as they provide flexible cloud compute options at a really attractive price tag, in particular capped at a fixed limit, so there’s no potential for surprise bills coming in. To make launching and configuring boxes in the Hetzner cloud as easy as possible for me, I have a simple set-up of Terraform and Ansible scripts. The former just launches up the desired number of compute nodes with the chosen spec, using the current version of Fedora as the operating system. The latter installs the tools I commonly need, such as different Java versions, commonly used CLI tools, and such. One neat thing about Hetzner Cloud is that you can easily scale up and down single instances.
So what I’ll usually do is to spin up a box in the smallest available configuration (CX11);
running this for a full month costs a whopping €4.15.
But then, when I actually want to use the node,
I’ll change the Terraform configuration to something more powerful,
such as the CCX22 instance type with 4 dedicated vCPU and 16 GB RAM.
One quick |
Cameras
So let’s change topics and talk a bit about my recording set-up. There’s essentially three scenarios where I need to record myself and/or my screen:
-
Video calls: working 100% from home in a globally distributed development team, there’s not a single day where I won’t have to do at least a couple of calls with my co-workers
-
Conference talks: with the global pandemic still going on, all the conferences have gone virtual, requiring either to pre-record or live-stream any talks
-
Demos: lately, I’ve become a fan of recording short videos introducing new features in the projects I’m involved with, e.g. the Debezium UI or kcctl
Additionally, I’m joining Nicolai Parlog once per month on his Twitch channel, where we talk about and explore all things Java.
While I initially used the internal camera and microphone of my laptop, I wasn’t really satisfied with the outcome, in particular once I saw the high quality of recordings shared by other folks. For a really good video image quality, two things are key: using a "real" camera (i.e. not a webcam), and proper lighting. You’ll also want a good external microphone, more on that below.
So why not a webcam? Essentially because sensors are too small and lenses are too slow, which means you’ll quickly have noise in the image and you won’t get that nice movie-like look with a shallow depth of field (bokeh). Using either a DSLR or a mirrorless system camera will yield a dramatically better image quality. In my case, I am using the Lumix GX80 (sold as GX85 in the US), a mirrorless system camera from Panasonic, using the Micro Four Thirds interchangeable lens standard.
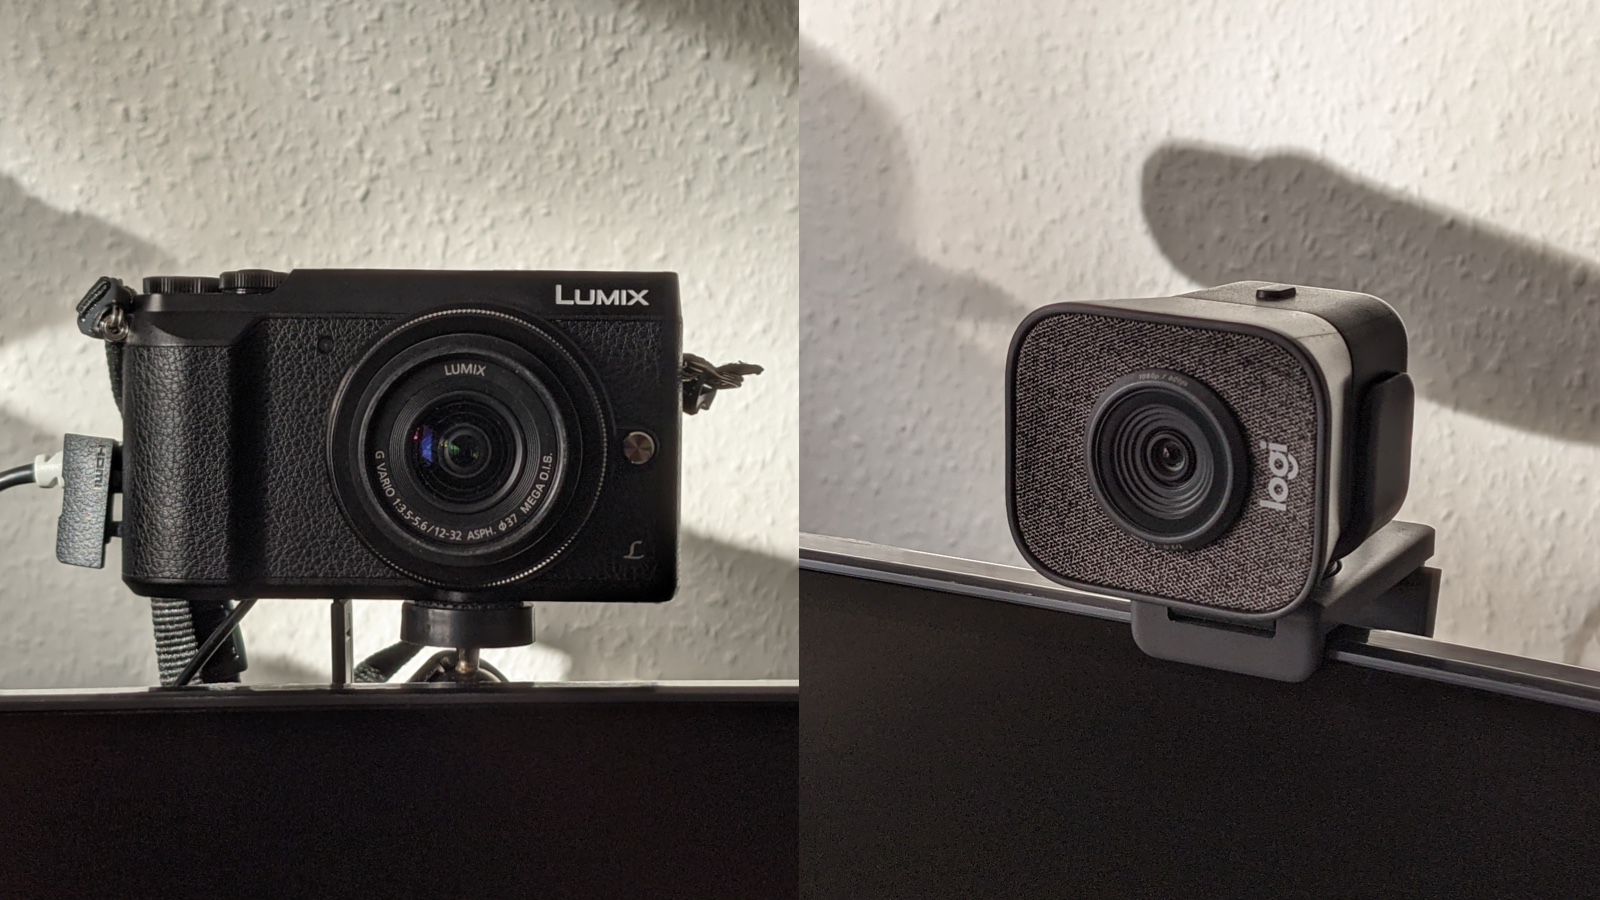
I’m generally happy with it for this purpose: it provides clean HDMI output (i.e. no menu overlays when capturing the live feed via HDMI, as it’s the case with some cameras), image quality and ergonomics are good overall. On the downside, it doesn’t provide continuous auto-focus if you’re not actually recording on the camera. This sounds worse than it actually is in practice: using the "Quick AF" option, it will auto-focus when turning on the camera, or when zooming in or out a bit, which is enough to get proper focussing in a relatively static setting such as a screen recording session. If you are planning to move forth and back a lot though, then you should look into other options. Another thing to mention is that the GX80 doesn’t allow to connect an external microphone to it; in my case, that doesn’t matter though, as I’m connecting the mic via a separate audio interface.
As you’d quickly run down the camera’s battery when streaming its video signal for a longer period of time, an external power source should be used. I’m using a dummy battery similar to this one, which does the job as expected. Just make sure to have an USB power adapter which provides enough output current (2A or more); I had missed that initially and was wondering why the camera would always turn off when pressing the focus button… . For a camera mount, I’m using this cheap one; it’s pretty crappy, with lots of wobbling, but once you have the camera in the place where you want it to be, it’ll stay there. Still, I’d probably pay a bit more to get a more robust mount, should I ever have to buy a new one.
As you typically cannot connect a DSLR or a mirrorless system camera like the GX80 via USB, you’ll also need an HDMI converter which you then can plug into your USB port. Here I’m using the ubiquitous Elgato Cam Link 4K. Back when I got it, it was pretty much the only (and pricy) option, but I believe by now there are alternatives, which should work equally well but are a bit cheaper.
Despite my "no webcam" mantra, I also have a Logitech StreamCam in addition to the GX80. As you’d expect, image quality is not really comparable, in particular white balance tends to be quite off for a while after switching it on. I still use it occasionally for video calls, as it’s a bit quicker to turn on and set up in comparison to the GX80.
Work in Progress: Teleprompter
One of my pet peeves with modern communication is the lack of "eye contact" during virtual conference talks and video calls. As we all want to look onto the screen rather than the camera, the viewer on the other side feels like you are not looking at them, but slightly below or to the side. While I believe I largely manage to look into the camera when doing talk recordings, I find it nearly impossible to do so during calls, as the natural desire to look at the other person’s image on my screen is just too strong.
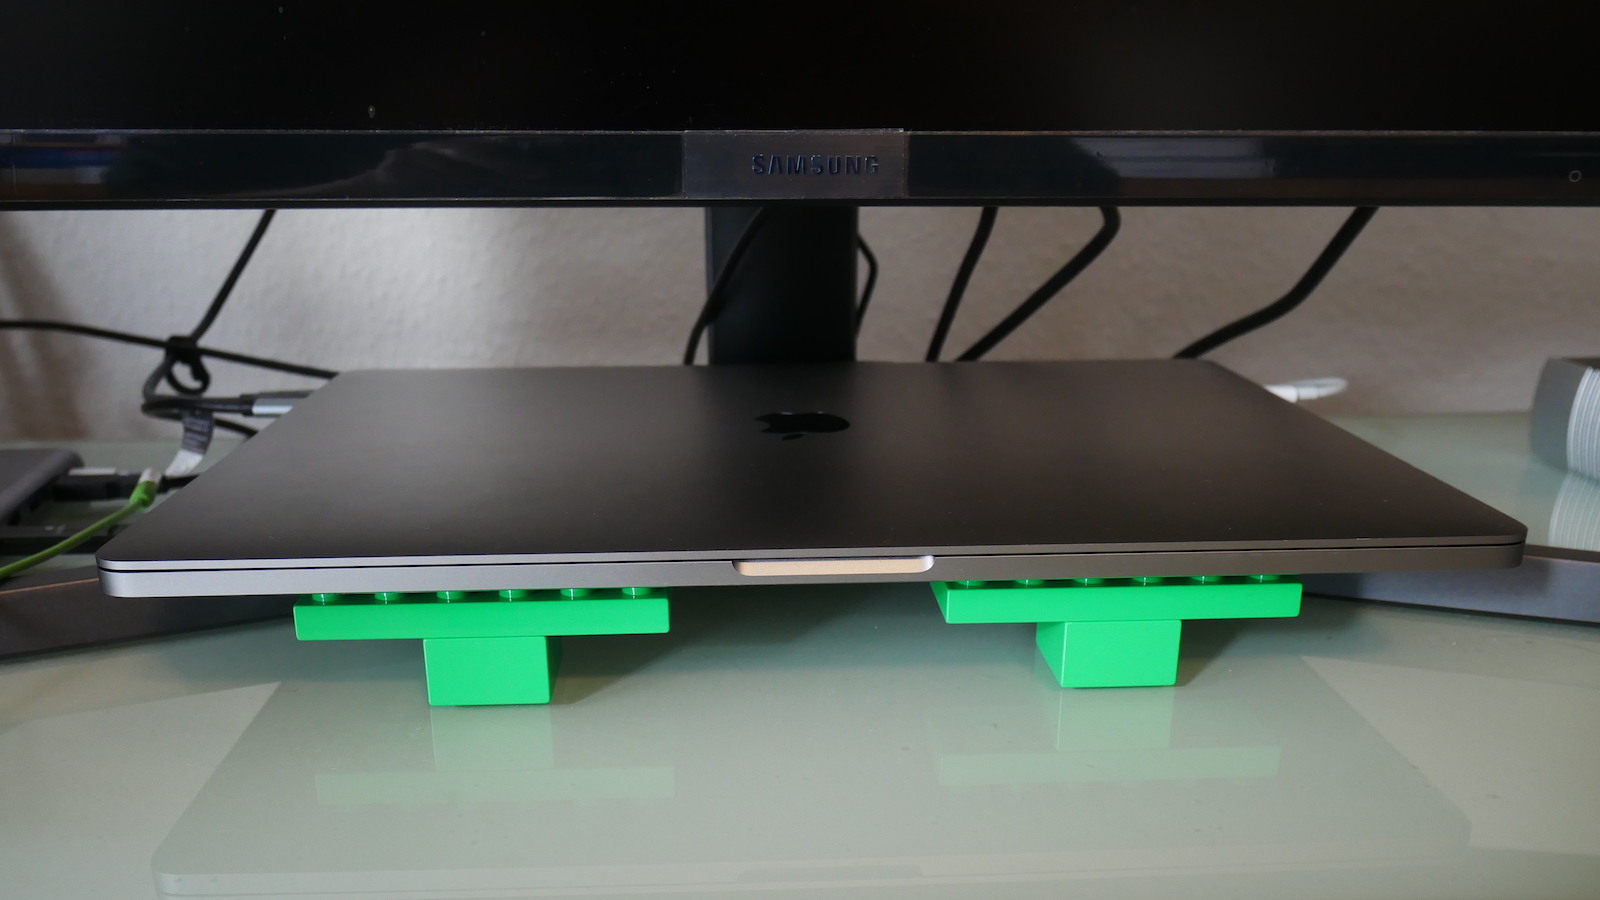
That’s why I’ve started to explore how I could build my own teleprompter, which puts the camera behind a two-way mirror. That way, I can look at the screen, while also looking straight into the camera. For this purpose, I bought two-way mirror glass on eBay (Schott beamsplitter glass, which is working amazingly well) as well as a cheap-ish external screen, and built a quick proof-of-concept (again using some of my daughter’s Duplo bricks, this time for the frame).
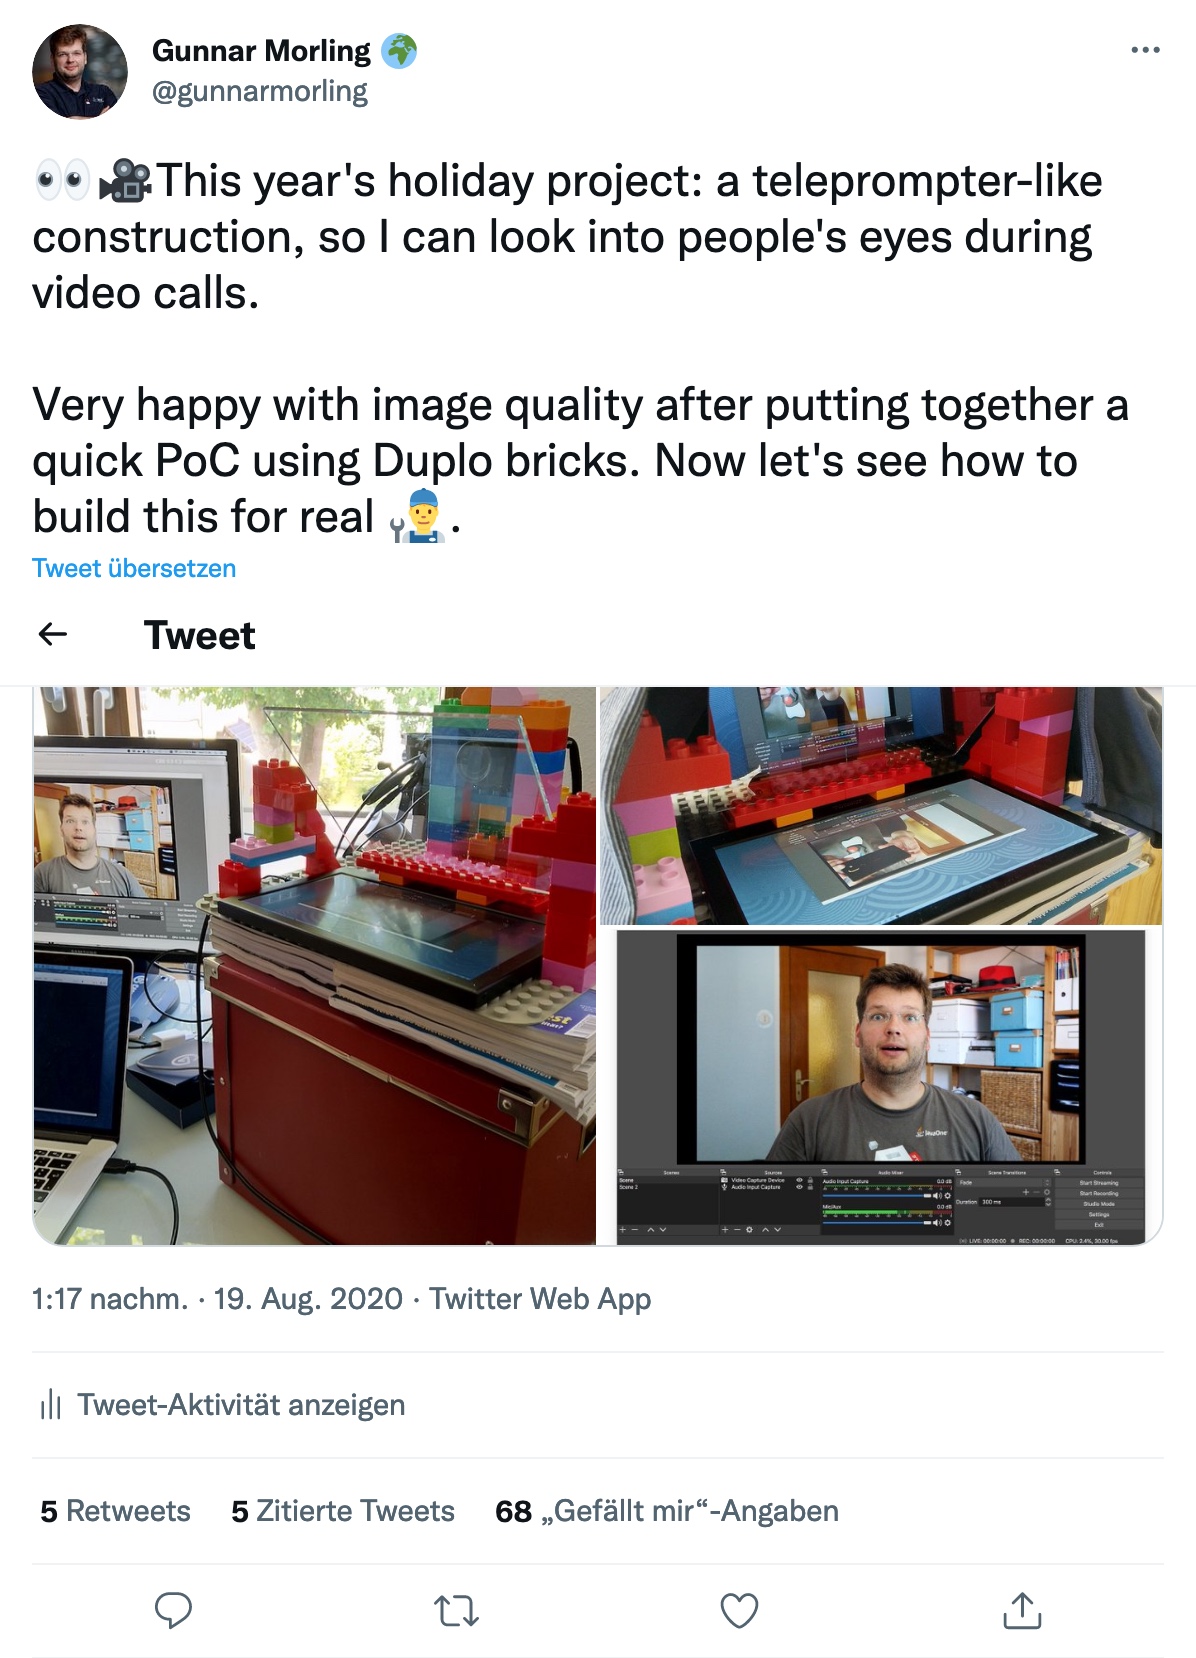
The result was pretty promising, with one open challenge being that the display contents are mirrored from left to right. So I’d need to digitally mirror the output of that display; if you are aware of any option to do so on macOS, any pointers would be appreciated. With 11.6", the screen also is rather small, if you consider building something like this by yourself, I’d recommend going for a larger one.
Since then, I’ve dropped that ball a bit and haven’t followed through yet to make it "production-worthy". I’d still love to make this useful in practice eventually, perhaps once my daughter lets me keep those Duplo bricks ;)
Lighting
The best camera won’t help you much if there isn’t enough light to work with. Generally, the more light you have, the easier the job will be for the camera. I have a ring light similar to this one, with adjustable brightness and color temperature. I don’t have much to say about it, other than that it does what I want it to do. Note that the tripod requires some space on the floor, which means you cannot move your desk all the way to the wall if you have the light behind it. It’s not that much of a problem in my case, but you may consider getting a desk-mount alternatively.
One problem I do have with the ring light is reflections on my glasses. I haven’t really found a good solution here (no, I won’t get contact lenses), other than pushing the ring light a bit higher than ideal, so that there are no reflections when looking into the camera further below. On the downside, this results in the area below my chin becoming a bit shaded. A case of having to choose your poison, I suppose.
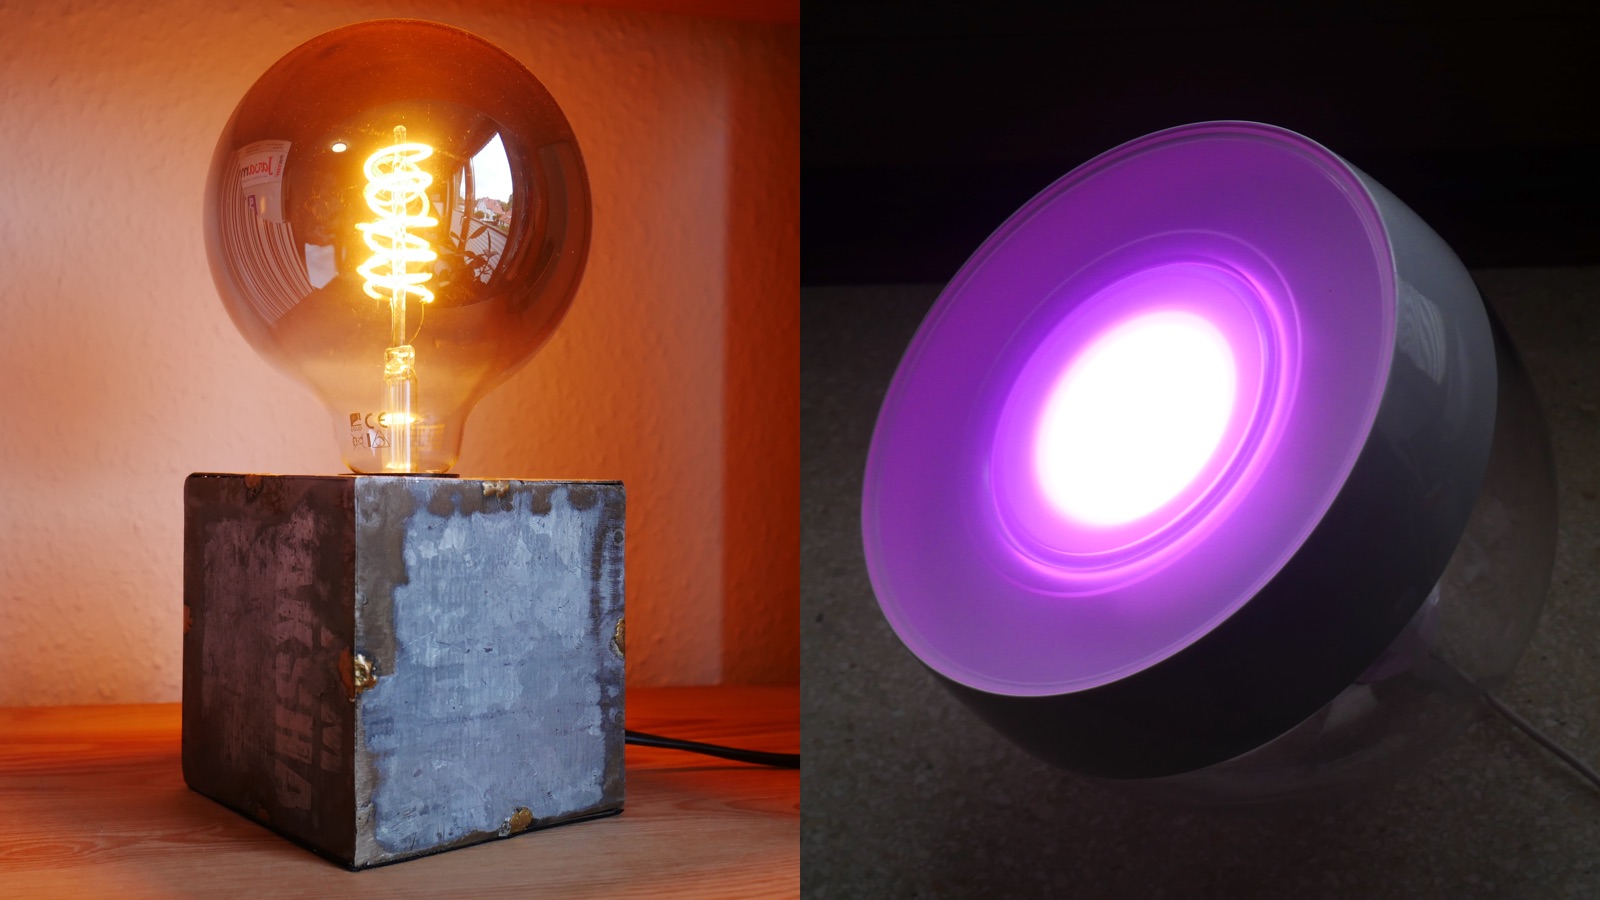
When doing conference talks, I have two more lights in the backgrounds which make for a nicer atmosphere of the scenery. A vintage light (no-name brand, got it from my local hardware store) which adds a nice highlight, and a Philips Hue Iris lamp which adds a colored note of my choosing. Overall, I’m like 90% happy with the lighting set-up, the comment by video grandmaster Nicolai about lacking separation of background and foreground still nags me ;)
Audio
Finally, let’s talk about my audio recording set-up. This definitely is the area I knew the least about when setting out to improve my computing and recording gear. I don’t quite remember when and how I got sucked into the audio game, perhaps it was when I learned about scientific research indicating that audio quality impacts the perceived quality of spoken content.
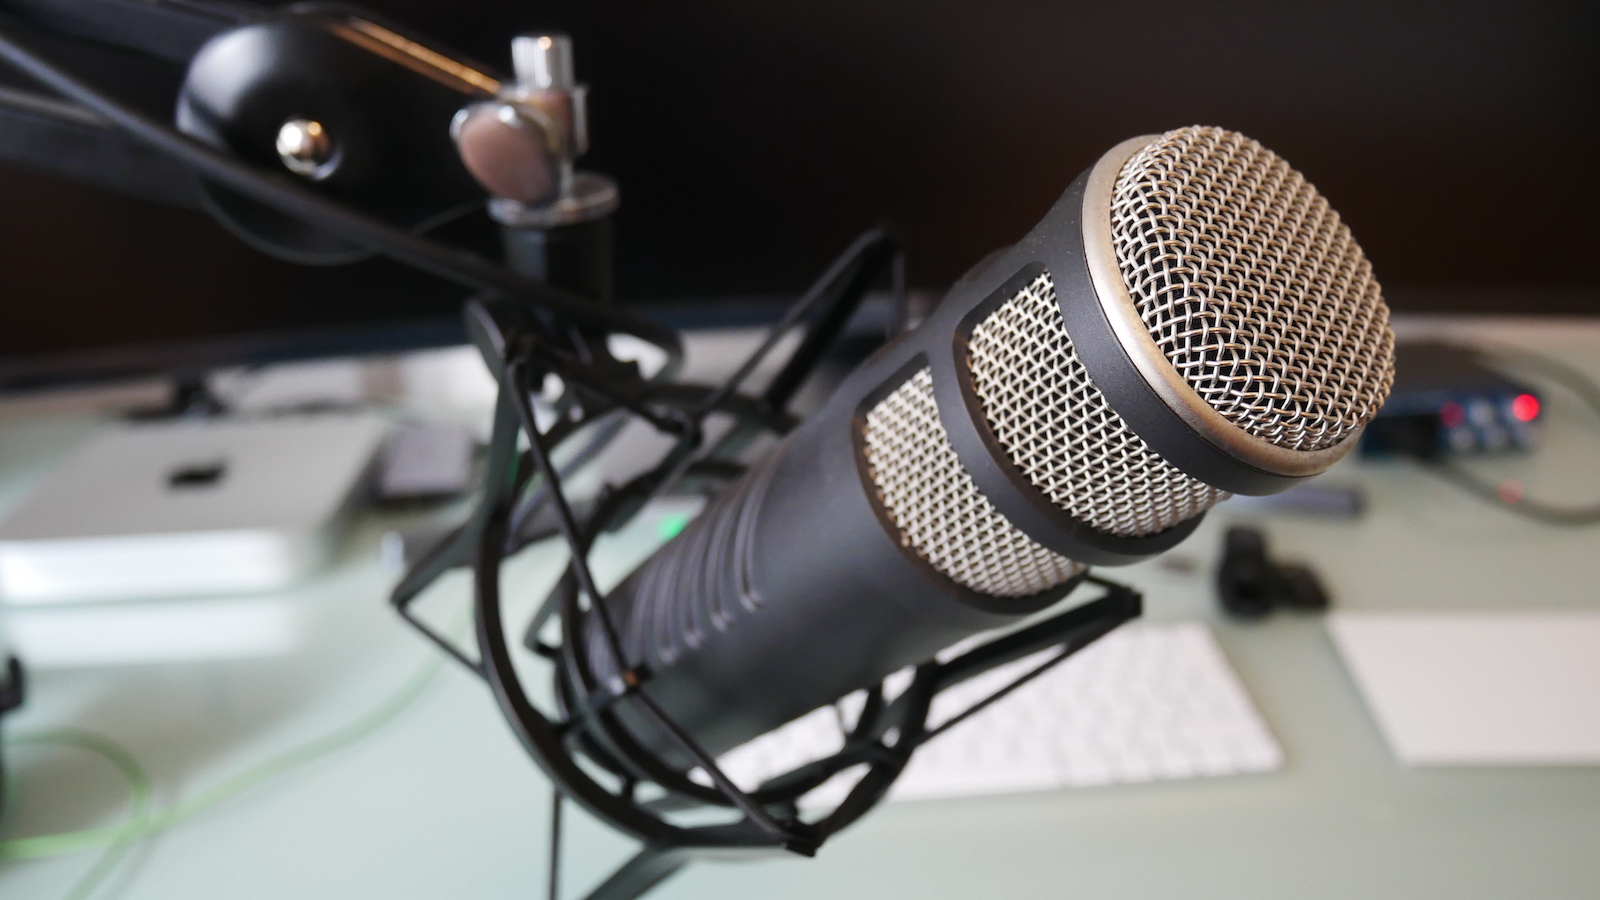
After a rather disappointing experience with the RØDE NT-USB (perhaps it’s my lack of audiophile sensitivity, but I didn’t sense a significant difference compared to using the built-in laptop mic), I decided to look for an external microphone which doesn’t connect via USB. After some research, I decided to go for the RØDE Procaster, which is a rather professional microphone purpose-built for voice recording. It is a dynamic microphone, which in comparison to a condenser microphone will pick up much less noise from your surroundings (you can learn more about the differences between these two kinds of microphones here). This means that I don’t have to ask my family to be extra-silent in the house while I am doing a recording.
One thing to keep in mind is that this type of microphone is meant to be put rather close to your mouth, which you may or may not find annoying. Personally, I sort of like how this makes speaking a more conscious act, but I’d probably not like to have the microphone in front of me when doing a multi-hour call. That’s why I also have a cheap-ish headset as an alternative for these situations. Yet another — and more costly — option would be to get a shotgun microphone which you can position further away from you.
The microphone is rather heavy (and you wouldn’t want to hold it anyways), so I am using the PSA1 studio boom arm. It lets you move the microphone with a single finger to where you want it to be, and then it will stay exactly there. A really solid piece of engineering, in particular when comparing it to the no-name mount I’m using for the camera.
Having an external microphone is just one part of the story, though. You also need to have an audio interface which lets you plug in the microphone (using an XLR cable) and then propagates the audio signal to your computer via USB. I didn’t do much exploration here, but went for the PreSonus AudioBox USB 96, which was recommended to me by a coworker. In general, it does the job well, there’s two things I don’t like about it though.
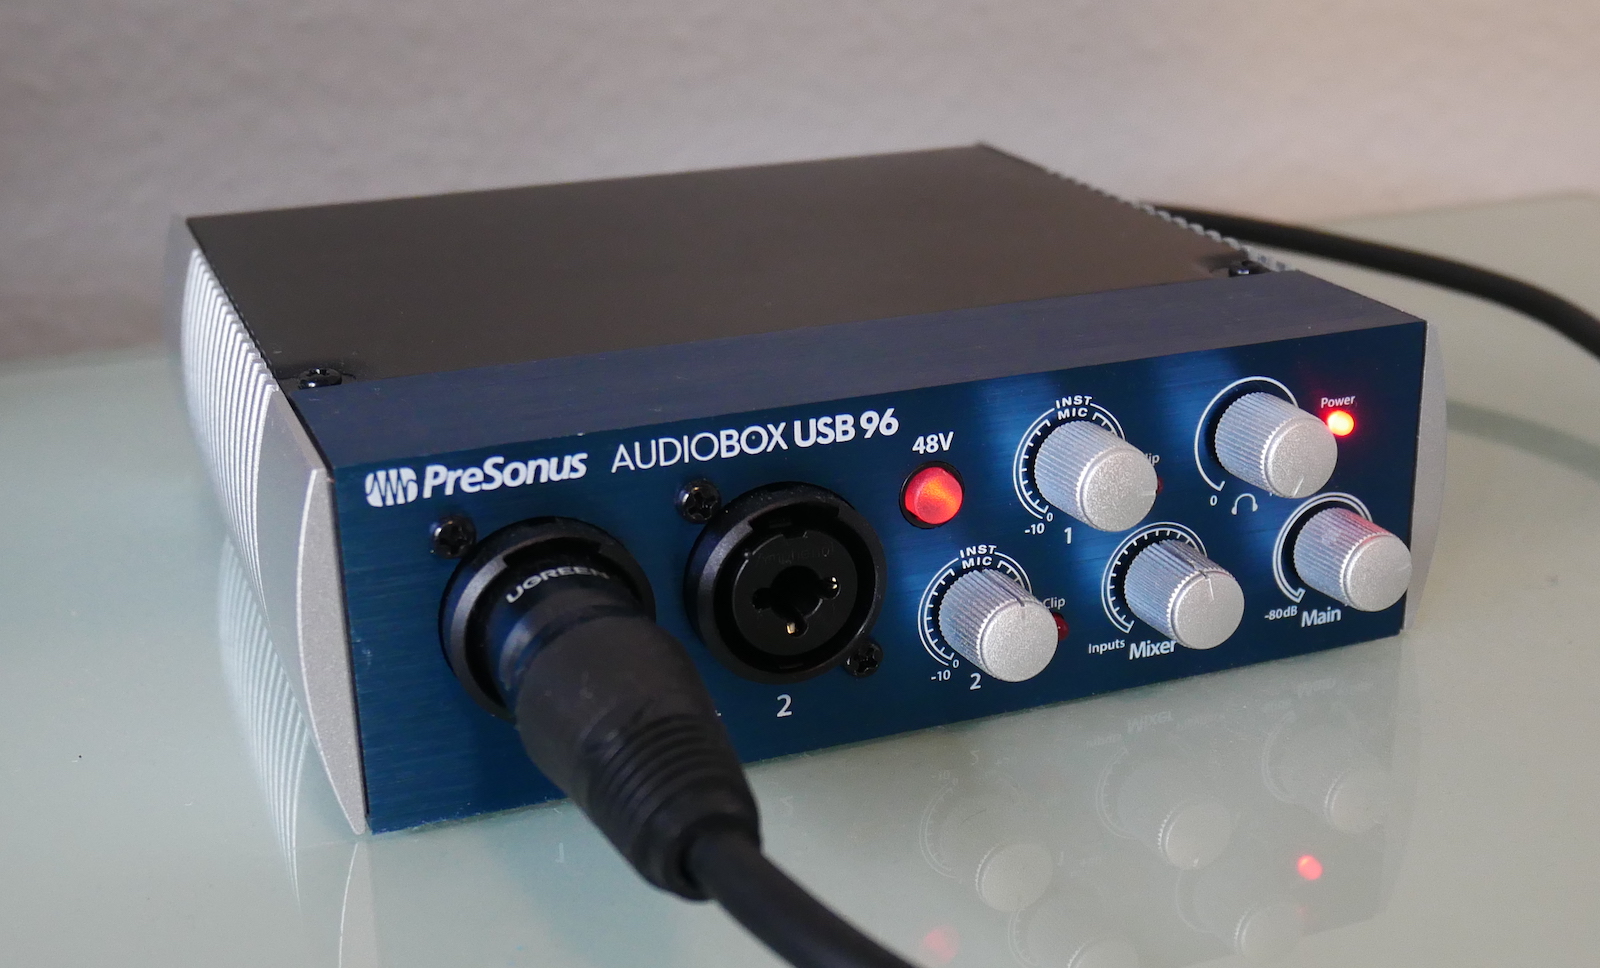
First, it doesn’t have a physical power switch, which means its two (rather bright) red LEDs will be lighting up as long as it’s connected to the USB port. Secondly, I really wished it would have a built-in option to emit the microphone signal on both audio channels, left and right. As a microphone is a mono audio source, you’ll hear the signal only on one channel (typically the left one) on your computer. When doing recordings, where you have the time and ability to do some post-processing, that’s not a big problem; you can simply duplicate the audio track to both channels. But when using the microphone in a Zoom call or similar, the one-sided output is not what you want. In absence of hardware support for this kind of upmixing in the AudioBox, I had to go for a software solution, which took me quite some time to figure out.
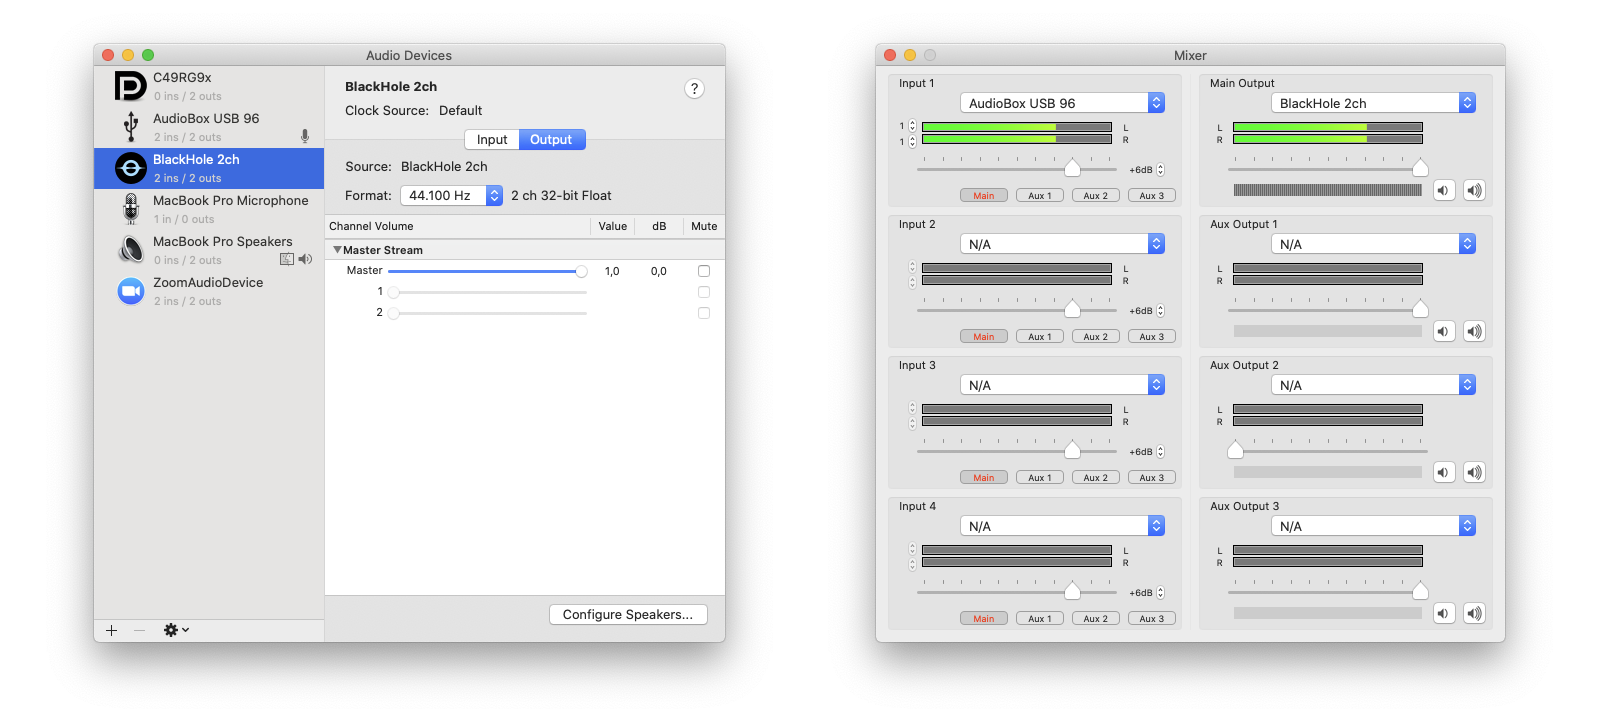
On macOS, this requires two programs, LadioCast and Blackhole. The former lets you take the single channel input from the AudioBox and expose it on both channels, left and right. This is then connected to a virtual audio device created using the BlackHole audio driver. In Zoom or similar software, you then use that virtual device for the audio input. This works reliably and without any noticeable latency. Still I wished the AudioBox would just take care of all of this and provide me with the microphone input upmixed to both channels.
Coming back to the microphone, one thing to be aware of is that it provides a rather low output signal. While you can boost it up far enough with the AudioBox, you’ll start to hear some noise. And I haven’t spent hundreds of Euros and multiple hours to get noise, have I?! So I did what every reasonable person would do in that situation: spend some more money.
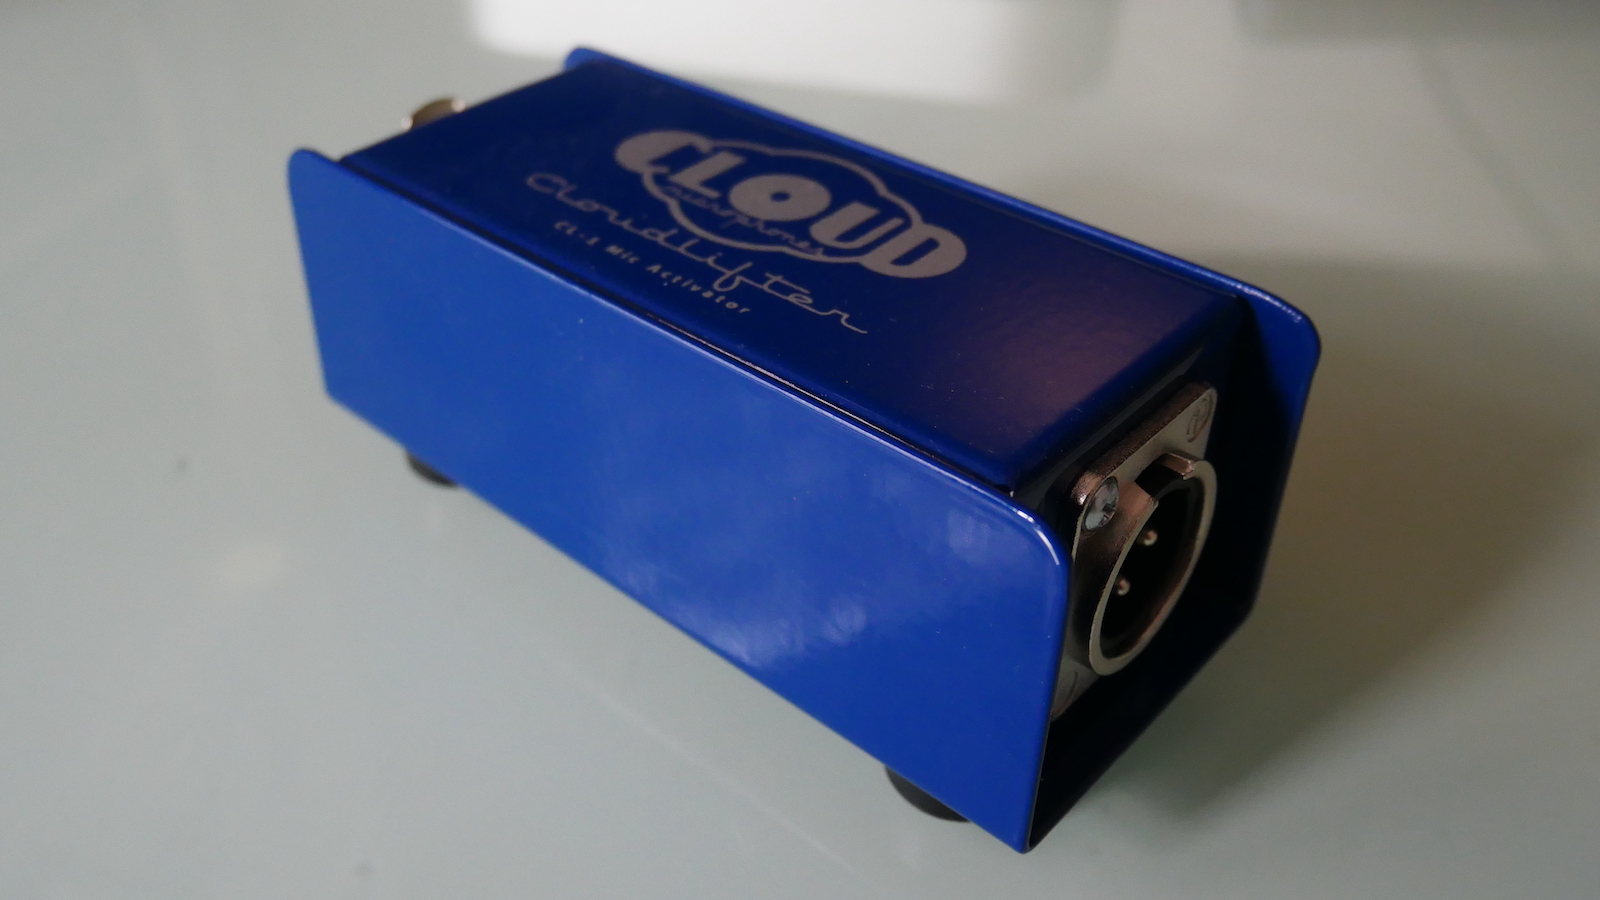
The solution was to add a pre-amplifier. Here I went for the CloudLifter, which you put between the microphone and the audio interface. It takes 48V phantom power (which the AudioBox provides) and adds +25dB of gain, giving me audio with proper volume, without any audible hiss whatsoever. Take that, sunken cost fallacy!
If you would like to hear (and see) a recording with this set-up, have a look at this session about the JfrUnit project from P99Conf earlier this year.
What’s Next?
Overall, I’m very happy with my computing and recording set-up. One thing that still could be improved is lighting. It’s a common practice to work with two front lights (or one from the front and one from the side), so I’ll probably buy another light at some point. I also hope to finish the teleprompter project and put it into daily use.
Other than that, I am sometimes wondering whether I should get a second mirrorless camera and a video switcher like the Atem Mini and explore a multi-camera set-up. I’m certain that this would be lots of fun, on the other hand I don’t really have the need for it… yet?
Many thanks to Hans-Peter Grahsl for his feedback while writing this blog post!